Good Morning Friends!! I am going to attempt my first post about the house, so wish me luck with these photos!! We are finally nearly finished with the living room. All that is left now is installing the new entry door, and finishing the trim. YAY!!! Thank goodness! For those of you who helped me with the grueling task of removing all that old wallpaper, ENJOY the finished product!
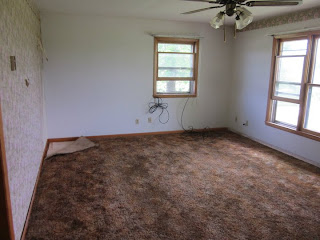
Here is a picture of the living room that I snapped when we first toured the house (prior to purchasing). Notice that dog bed...the entire house was saturated with animals smells. We had to air the place out for two solid weeks before we could even stand to go in and work on it.
Here's another picture I snapped on the first tour. This is the other side of the living room, and also the front door. (This house was built in the 60's so they saw no reason why the front door shouldn't open right up into the living room, sheesh)
Here's the living room all cleared out and ready for some TLC! :)
This fabulous (errr should I say "vintage") linoleum is what was glued down in the living room by the front door.
Let the fun begin!! I took a break from stripping wallpaper to snap this photo. We were lucky in the living room, only two walls were fully covered with wallpaper, and they only had two layers at that! We found that the most efficient technique to strip wallpaper off is to use a steamer and literally steam the wallpaper until it was moist enough that a putty knife could be used to scrape the drywall clean; glue and all. Time consuming, but great results!
At this point, we were ready to texturize our walls, which is why the windows are covered. Notice that awesome carpet is still there... We decided to leave it down until we were done painting, so we could protect the gorgeous hardwood floors we found underneath.
Here's Mom helping me paint the living room. Thanks so much for spending your Fourth of July with me and some buckets of paint! :)
And now, Ladies and Gentlemen...*insert drum roll*...our almost fully renovated living room!!!
Wow!! She's a beaut! I missed getting photos of the original hardwood floors, but they were a much lighter color. We sanded them down, stained them Jacobean (by Minwax), and then sealed them up. You can see part of the baseboard has been installed in this photo, as well as our new ceiling fan. We decided to keep the old windows for now (hoping to replace them with vinyl windows in a few years) so they also got the sanding treatment, and are primed (in this photo) for painting.
I am so thankful to Jessica and Lacy for helping me strip the wallpaper in this room, to Mom for helping paint, to Brooke for helping remove that tacky old Linoleum, and most of all to Drew for helping make my vision come to life! XOXO!
Stay tuned for updates on the rest of the rooms in the house :)


